
Setup a C++ dev environment
 DigitalBox
- Dev
- October 23, 2024
If you discovered recently Haiku operating system, you might be interested in making a few programs on it using the Haiku API.
In this article I will explain how to prepare in 5 minutes a quick environment to start coding from scratch.
After that, you will never say development is boring on Haiku ;)
Prerequisites
Maybe you don't know, but the standard installation of Haiku is already including most of the tools needed to start coding.
And you know what ?
It's funny.
I will illustrate what you need by the image below :

As a minimum you will need :
- The default web browser WebPositive
- A Terminal to launch commands
- The default code editor Pe (also called "lpe")
- The default Debugger
And that's it !
I consider WebPositive as a required tool, because it will allow you to browse the Haiku API, but also to connect to Chat GPT (or another AI tool) to gather or cross-check additional information needed during your development process.
Now, let's move on to the remaining steps to setup your environment. First, a good habit is to update your system to latest version.
Launch the application "SoftwareUpdater" and proceed with the update :
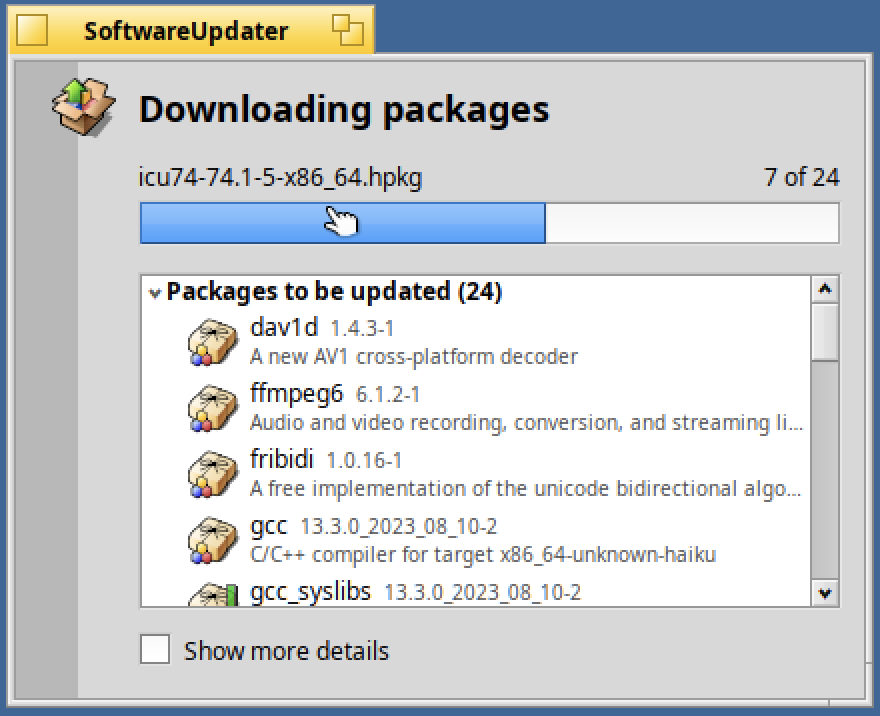
You might need to restart your system.
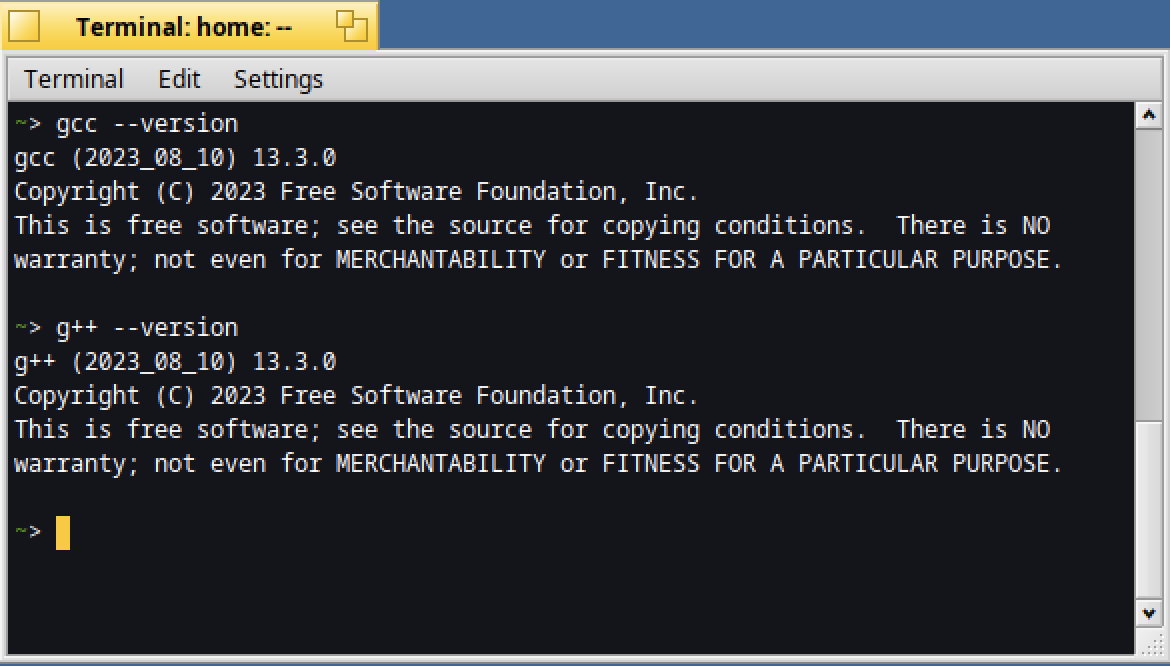
Now, let's check what we have so far :
No need to install WebPositive, Pe or the Debugger as they are included in the default installation of Haiku.
For the compilation, you can check the version installed for the C and C++ compilers.
For that type :
gcc --version
g++ --version
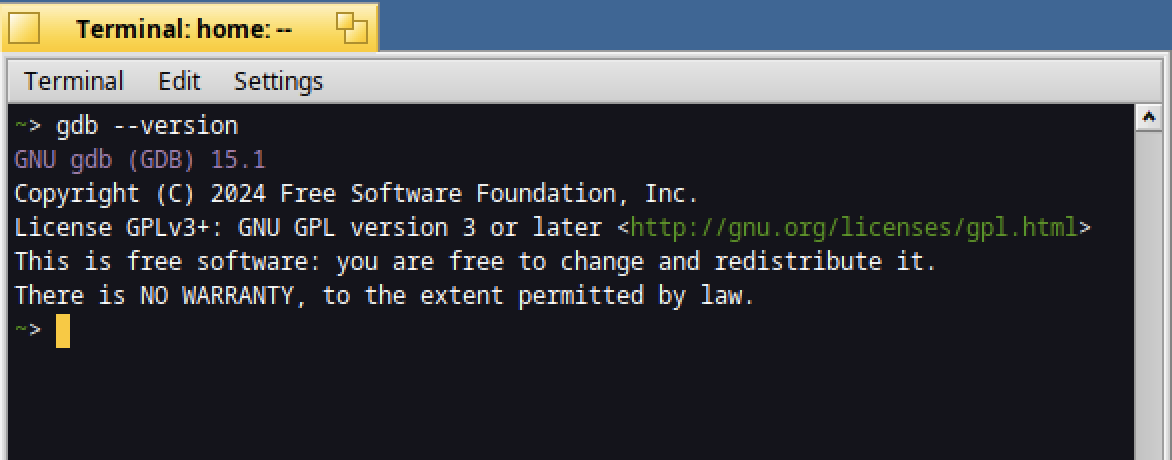
Even if we will use the Debugger application for debugging, I advice you to install also the GNU Debugger (GDB), as in some situations it can help a lot.
pkgman install gdb
gdb --version
As the example for the coding part will use OpenGL, we need to install the GLU development files (including the C/C++ header files) :
pkgman install glu_devel
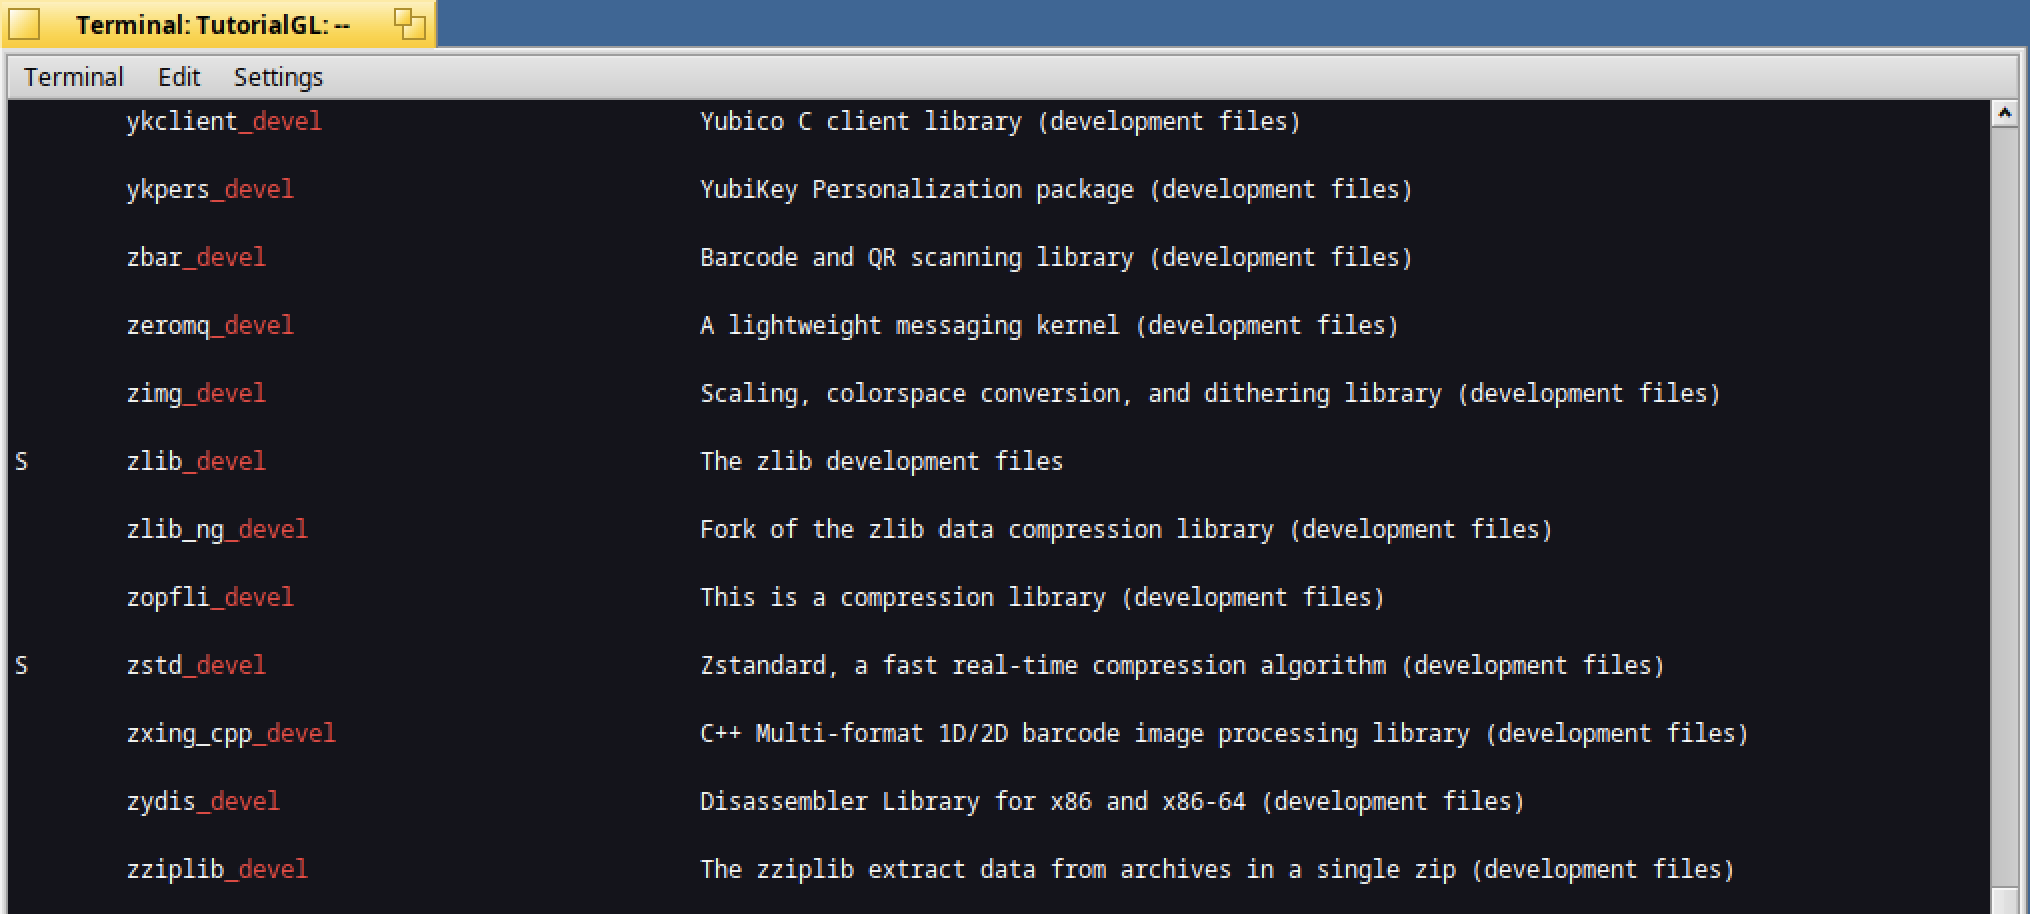
In general the libraries used for development are suffixed with "_devel" :
pkgman search -a | grep "_devel"
Now we are good to go !
Coding
I will not explain how to code in C++ for Haiku using Haiku API or how to code with OpenGL.
The idea here is just to show you a working program and which tool will be useful to edit and enhance it.
Open the Pe editor and copy/paste the below OpenGL program :
#include <Application.h>
#include <Window.h>
#include <GLView.h>
#include <GL/gl.h>
#include <GL/glu.h>
#include <MessageRunner.h>
class MyGLView : public BGLView {
public:
    MyGLView(BRect frame)
        : BGLView(frame, "MyGLView", B_FOLLOW_ALL, 0, BGL_RGB | BGL_DOUBLE | BGL_DEPTH) {
        rotationAngleX = 0.0f;
        rotationAngleY = 0.0f;
        rotationAngleZ = 0.0f;
        speedX = 1.0f;
        speedY = 1.5f;
        speedZ = 0.5f;
    }
    void AttachedToWindow() override {
        BGLView::AttachedToWindow();
        LockGL();
        // Enable depth test for correct rendering of 3D
        glEnable(GL_DEPTH_TEST);
        // Enable lighting and set up a basic light
        glEnable(GL_LIGHTING);
        glEnable(GL_LIGHT0);
        // Enable color tracking (utilise les couleurs définies par glColor3f())
        glEnable(GL_COLOR_MATERIAL);
        glColorMaterial(GL_FRONT_AND_BACK, GL_DIFFUSE);  // Apply diffuse color to cube's faces
        // Define the light's position and color
        GLfloat lightPos[] = { 1.0f, 1.0f, 1.0f, 0.0f };  // Light position
        GLfloat lightDiffuse[] = { 0.9f, 0.9f, 0.9f, 1.0f };  // Light diffuse color
        glLightfv(GL_LIGHT0, GL_POSITION, lightPos);
        glLightfv(GL_LIGHT0, GL_DIFFUSE, lightDiffuse);
        // Set up projection matrix
        glMatrixMode(GL_PROJECTION);
        glLoadIdentity();
        gluPerspective(45.0, Bounds().Width() / Bounds().Height(), 0.1, 100.0);
        UnlockGL();
        // Start a message runner to rotate the cube every 20ms
        fRunner = new BMessageRunner(BMessenger(this), new BMessage('rot8'), 20000);
    }
    void Draw(BRect updateRect) override {
        LockGL();
        // Clear color and depth buffers
        glClear(GL_COLOR_BUFFER_BIT | GL_DEPTH_BUFFER_BIT);
        // Switch to the model view matrix
        glMatrixMode(GL_MODELVIEW);
        glLoadIdentity();
        // Set up the camera (move back to view the cube)
        glTranslatef(0.0f, 0.0f, -5.0f);
        // Apply the rotations on each axis independently
        glRotatef(rotationAngleX, 1.0f, 0.0f, 0.0f);  // Rotation around the X axis
        glRotatef(rotationAngleY, 0.0f, 1.0f, 0.0f);  // Rotation around the Y axis
        glRotatef(rotationAngleZ, 0.0f, 0.0f, 1.0f);  // Rotation around the Z axis
        // Draw the cube with different colors for each face
        glBegin(GL_QUADS);
        // Front face (#FF7600)
        glColor3f(1.0f, 0.46f, 0.0f);  // RGB for #FF7600
        glNormal3f(0.0f, 0.0f, 1.0f);
        glVertex3f(-1.0f, -1.0f, 1.0f);
        glVertex3f(1.0f, -1.0f, 1.0f);
        glVertex3f(1.0f, 1.0f, 1.0f);
        glVertex3f(-1.0f, 1.0f, 1.0f);
        // Back face (#FFD300)
        glColor3f(1.0f, 0.83f, 0.0f);  // RGB for #FFD300
        glNormal3f(0.0f, 0.0f, -1.0f);
        glVertex3f(-1.0f, -1.0f, -1.0f);
        glVertex3f(-1.0f, 1.0f, -1.0f);
        glVertex3f(1.0f, 1.0f, -1.0f);
        glVertex3f(1.0f, -1.0f, -1.0f);
        // Left face (#43AE39)
        glColor3f(0.26f, 0.68f, 0.22f);  // RGB for #43AE39
        glNormal3f(-1.0f, 0.0f, 0.0f);
        glVertex3f(-1.0f, -1.0f, -1.0f);
        glVertex3f(-1.0f, -1.0f, 1.0f);
        glVertex3f(-1.0f, 1.0f, 1.0f);
        glVertex3f(-1.0f, 1.0f, -1.0f);
        // Right face (#336698)
        glColor3f(0.2f, 0.4f, 0.6f);  // RGB for #336698
        glNormal3f(1.0f, 0.0f, 0.0f);
        glVertex3f(1.0f, -1.0f, -1.0f);
        glVertex3f(1.0f, 1.0f, -1.0f);
        glVertex3f(1.0f, 1.0f, 1.0f);
        glVertex3f(1.0f, -1.0f, 1.0f);
        // Top face (#FFB1A9)
        glColor3f(1.0f, 0.69f, 0.66f);  // RGB for #FFB1A9
        glNormal3f(0.0f, 1.0f, 0.0f);
        glVertex3f(-1.0f, 1.0f, -1.0f);
        glVertex3f(-1.0f, 1.0f, 1.0f);
        glVertex3f(1.0f, 1.0f, 1.0f);
        glVertex3f(1.0f, 1.0f, -1.0f);
        // Bottom face (#FFD5FF)
        glColor3f(1.0f, 0.84f, 1.0f);  // RGB for #FFD5FF
        glNormal3f(0.0f, -1.0f, 0.0f);
        glVertex3f(-1.0f, -1.0f, -1.0f);
        glVertex3f(1.0f, -1.0f, -1.0f);
        glVertex3f(1.0f, -1.0f, 1.0f);
        glVertex3f(-1.0f, -1.0f, 1.0f);
        glEnd();
        // Swap buffers for double buffering
        SwapBuffers();
        UnlockGL();
    }
    void FrameResized(float newWidth, float newHeight) override {
        BGLView::FrameResized(newWidth, newHeight);
        LockGL();
        // Adjust the OpenGL viewport to the new window size
        glViewport(0, 0, (GLint)newWidth, (GLint)newHeight);
        // Update the projection matrix to maintain the correct aspect ratio
        glMatrixMode(GL_PROJECTION);
        glLoadIdentity();
        float aspectRatio = newWidth / newHeight;
        gluPerspective(45.0, aspectRatio, 0.1, 100.0);
        UnlockGL();
    }
    void MessageReceived(BMessage* message) override {
        if (message->what == 'rot8') {
            RotateCube();
        } else {
            BGLView::MessageReceived(message);
        }
    }
    void RotateCube() {
        // Update rotation angles based on their respective speeds
        rotationAngleX += speedX;
        rotationAngleY += speedY;
        rotationAngleZ += speedZ;
        // Reset the angles if they exceed 360 degrees
        if (rotationAngleX >= 360.0f) rotationAngleX = 0.0f;
        if (rotationAngleY >= 360.0f) rotationAngleY = 0.0f;
        if (rotationAngleZ >= 360.0f) rotationAngleZ = 0.0f;
        Invalidate();  // Mark the view for redrawing
    }
private:
    float rotationAngleX, rotationAngleY, rotationAngleZ;
    float speedX, speedY, speedZ;
    BMessageRunner* fRunner;
};
class MyWindow : public BWindow {
public:
    MyWindow(BRect frame)
        : BWindow(frame, "OpenGL Cube", B_TITLED_WINDOW, B_QUIT_ON_WINDOW_CLOSE) {
        BRect bounds = Bounds();
        MyGLView *glView = new MyGLView(bounds);
        AddChild(glView);
        glView->MakeFocus(true);
    }
};
// Main program
class MyApplication : public BApplication {
public:
    MyApplication() : BApplication("application/x-vnd.OpenGLCubeApp") {}
    void ReadyToRun() {
        BWindow *window = new MyWindow(BRect(100, 100, 500, 500));
        window->Show();
    }
};
int main() {
    MyApplication app;
    app.Run();
    return 0;
}
You should have the below :
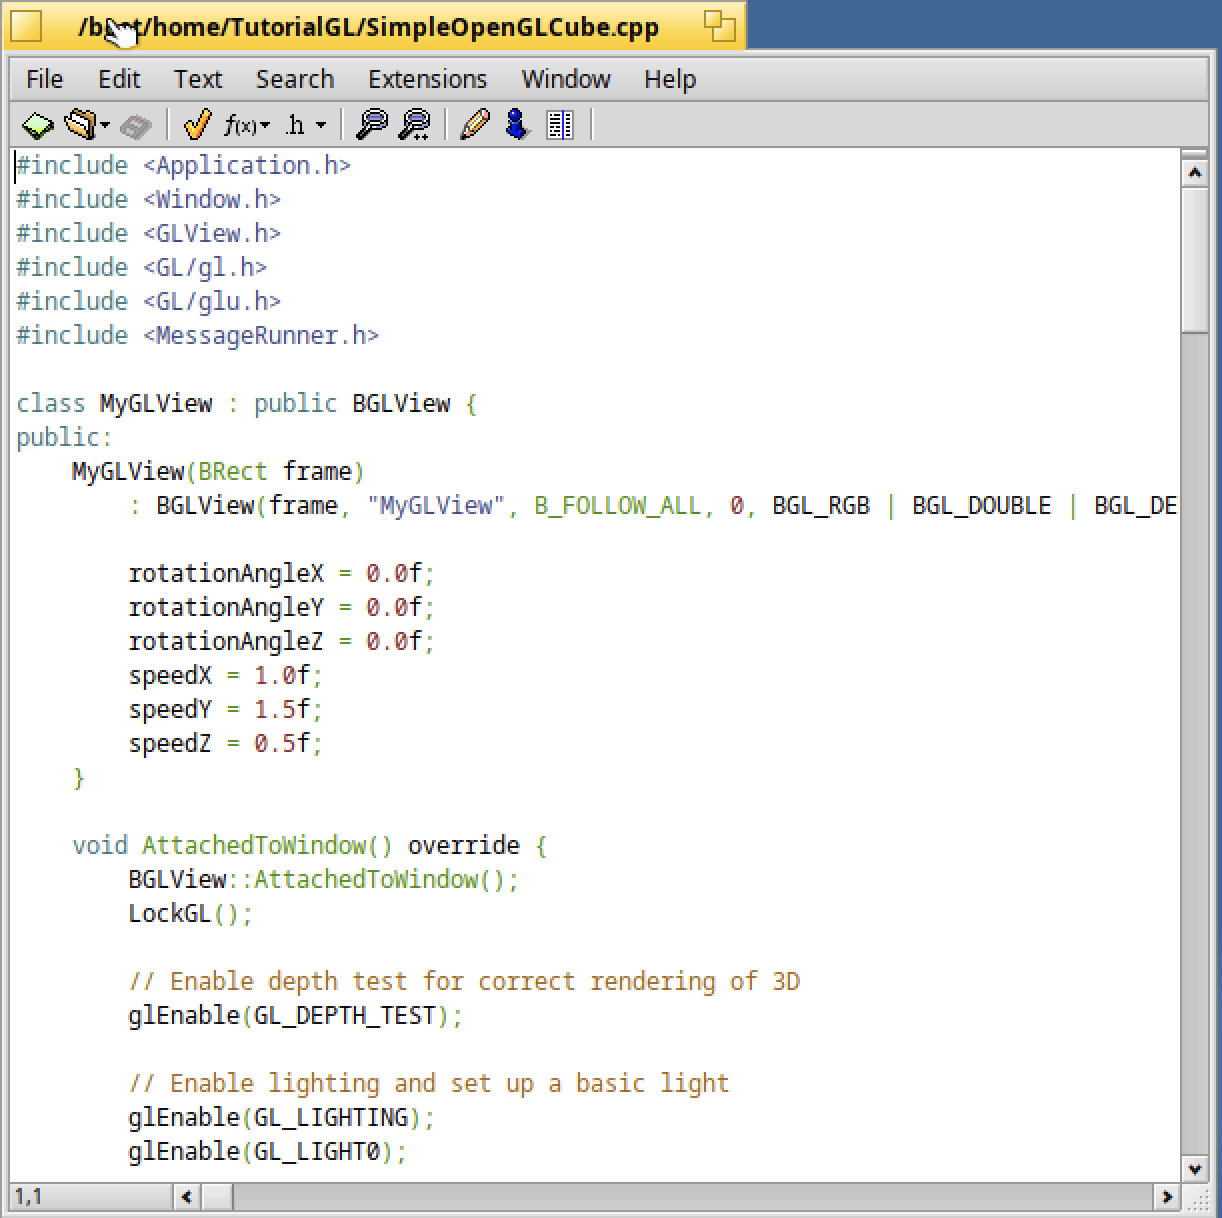
Save the file under the name "SimpleOpenGLCube.cpp".
If you want to make some enhancements, you can update the source code, or find some information on this piece of code via AI like ChatGPT through WebPositive.
This code represents a quite "simple" program which is displaying a colored Cube and rotate it over time:)
Compiling
Let's see how to compile "SimpleOpenGLCube.cpp".
Open a Terminal where you have saved the ".cpp" file and type :
g++ SimpleOpenGLCube.cpp -g -O2 -o SimpleOpenGLCube -lGL -lGLU -lbe

Here are a few explanations about this command :
- the "-g -O2" options are used for generating an executable which can be debugged with optimisations
- the "-o" option indicate the name of the output executable to generate
- the "-lGL -lGLU -lbe" options are required to link ("l" as "link") with "OpenGL", "GLU" and also the "be" libraries
Running and debugging
Now the easy part, launch in the Terminal the program generated :
SimpleOpenGLCube
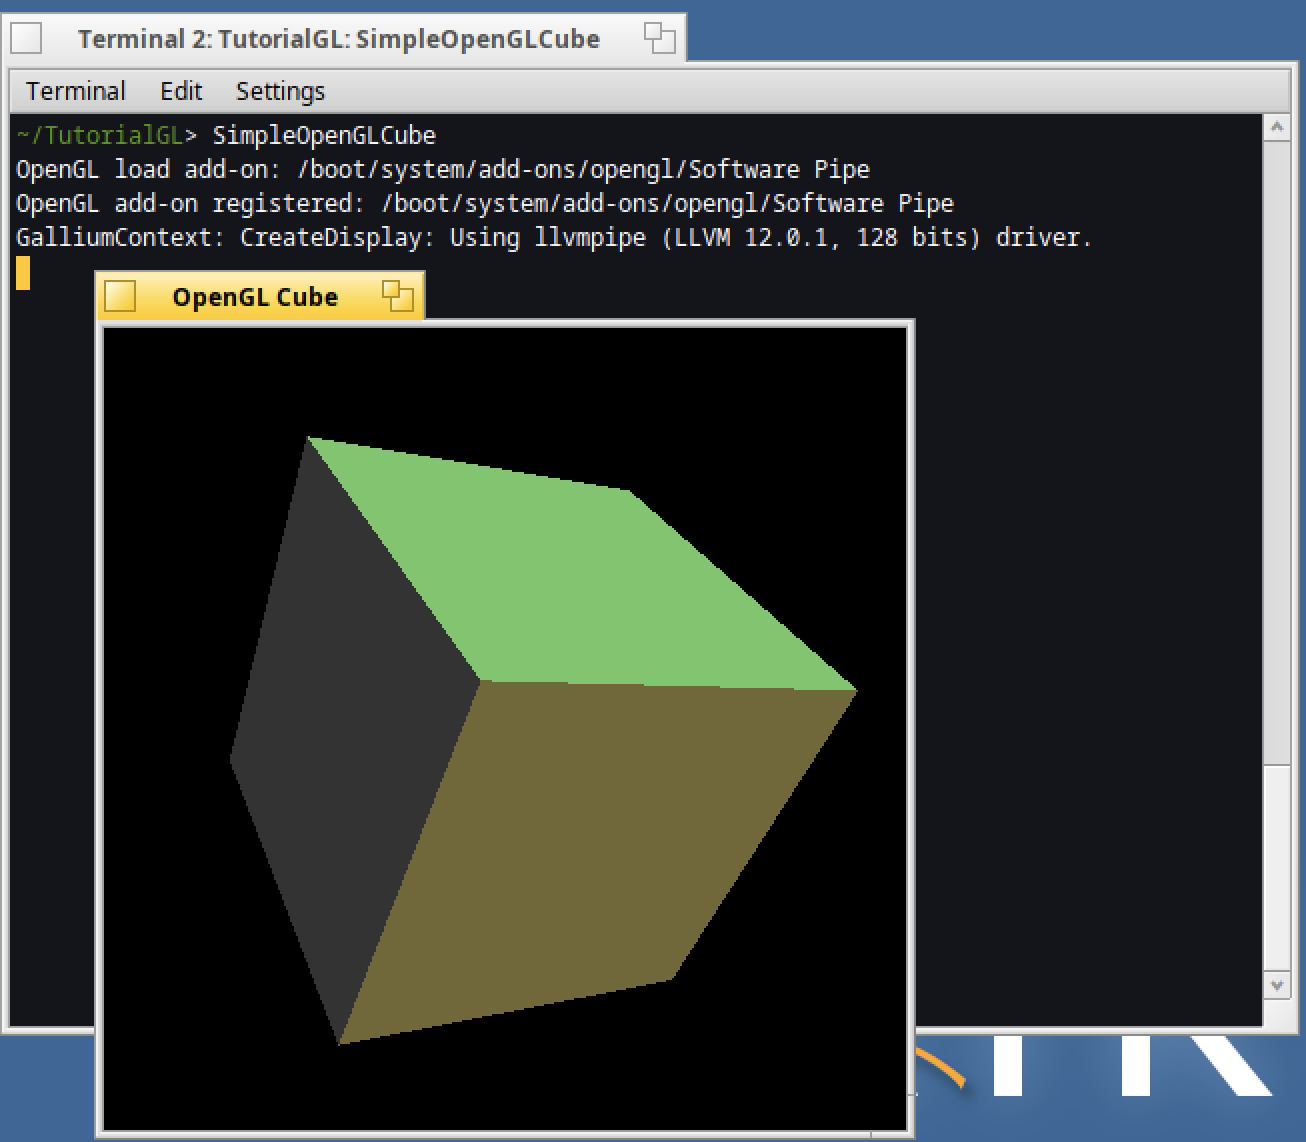
If you see a nice colored cube rotating, then you succeed !
For debugging such a small program, this is quite simple also. But before, launch the Pulse application :
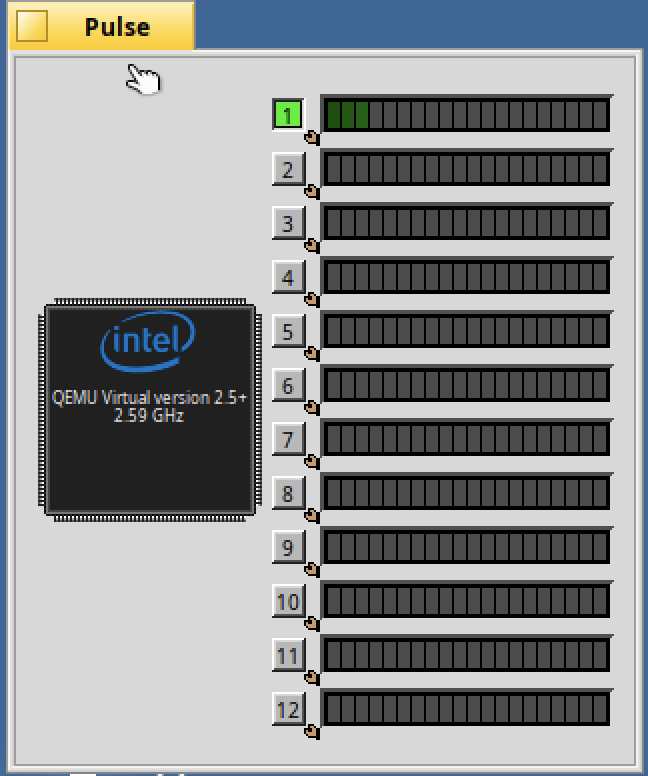
Activate only one processor.
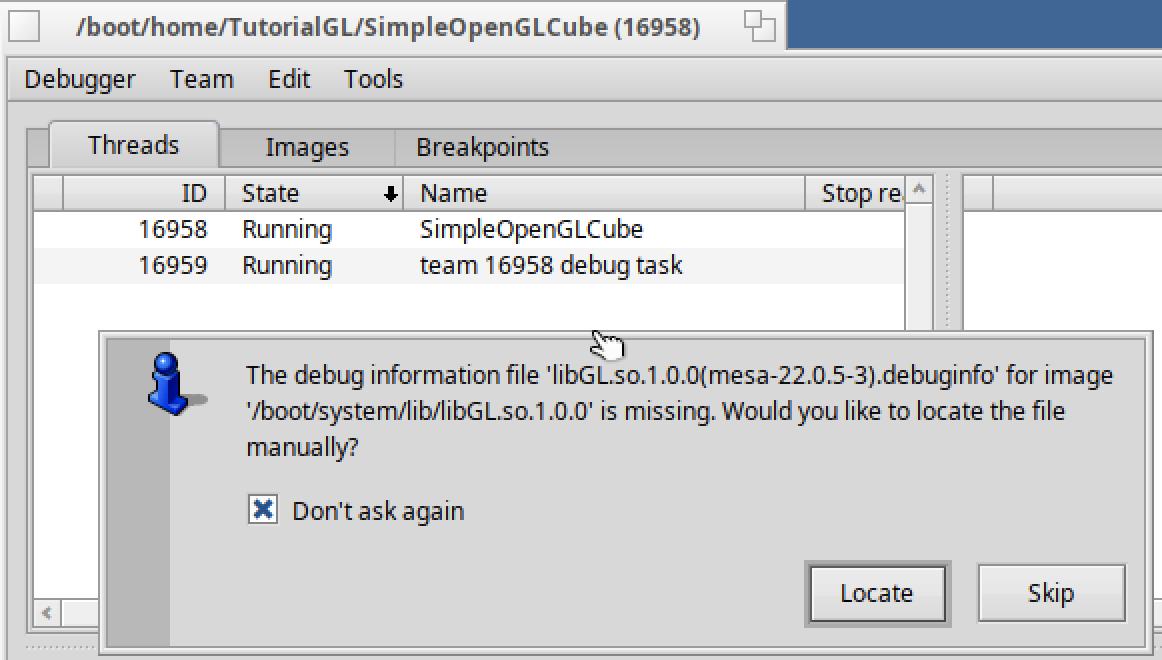
Then, you just need to launch Debugger followed by the name of your program :
Debugger SimpleOpenGLCube

There are a few annoying warnings you can ignore.
Tick the "Don't ask again" option and click on "Skip" :
Same for the below warning :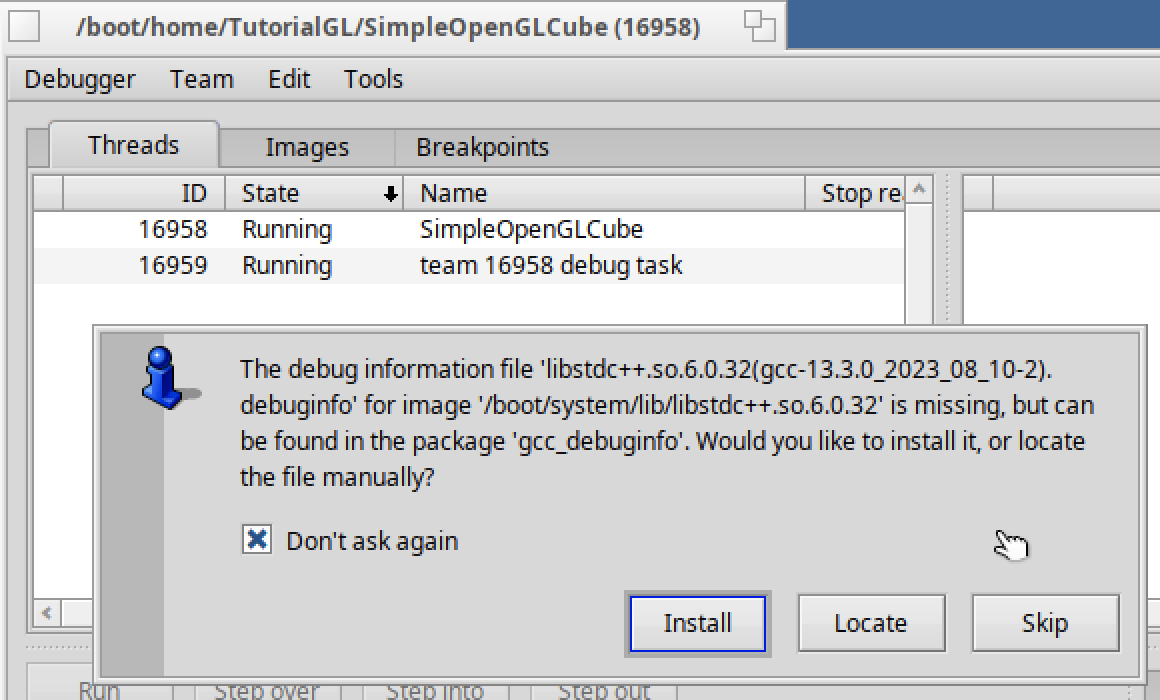
Once the Debugger is opened, please notice :
- A breakpoint is applied by default on the main() function
- "Debugged" indicate the program has stopped waiting for your action
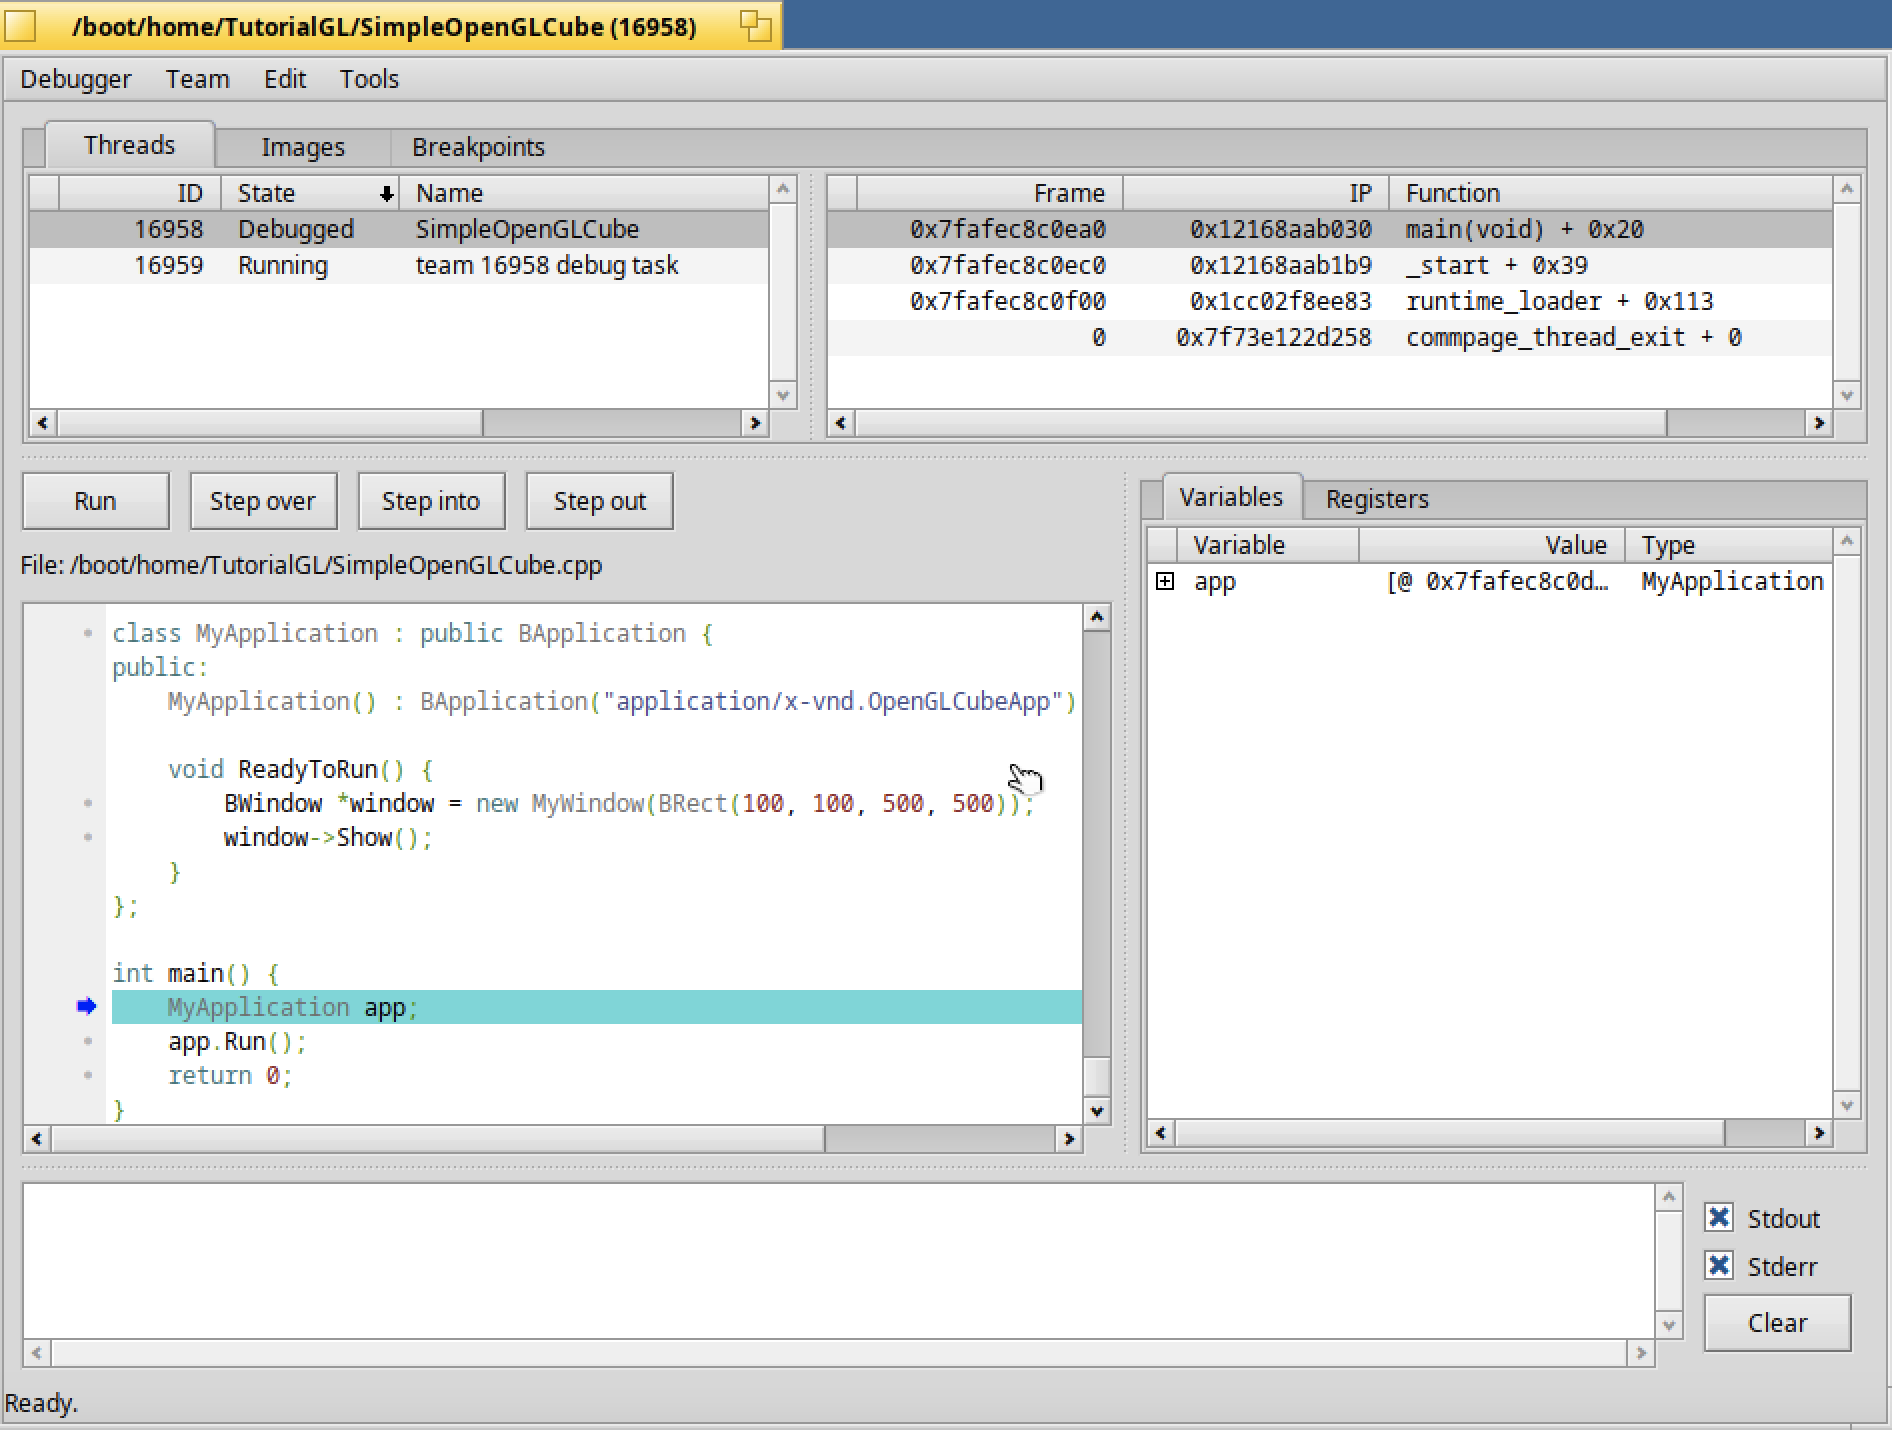
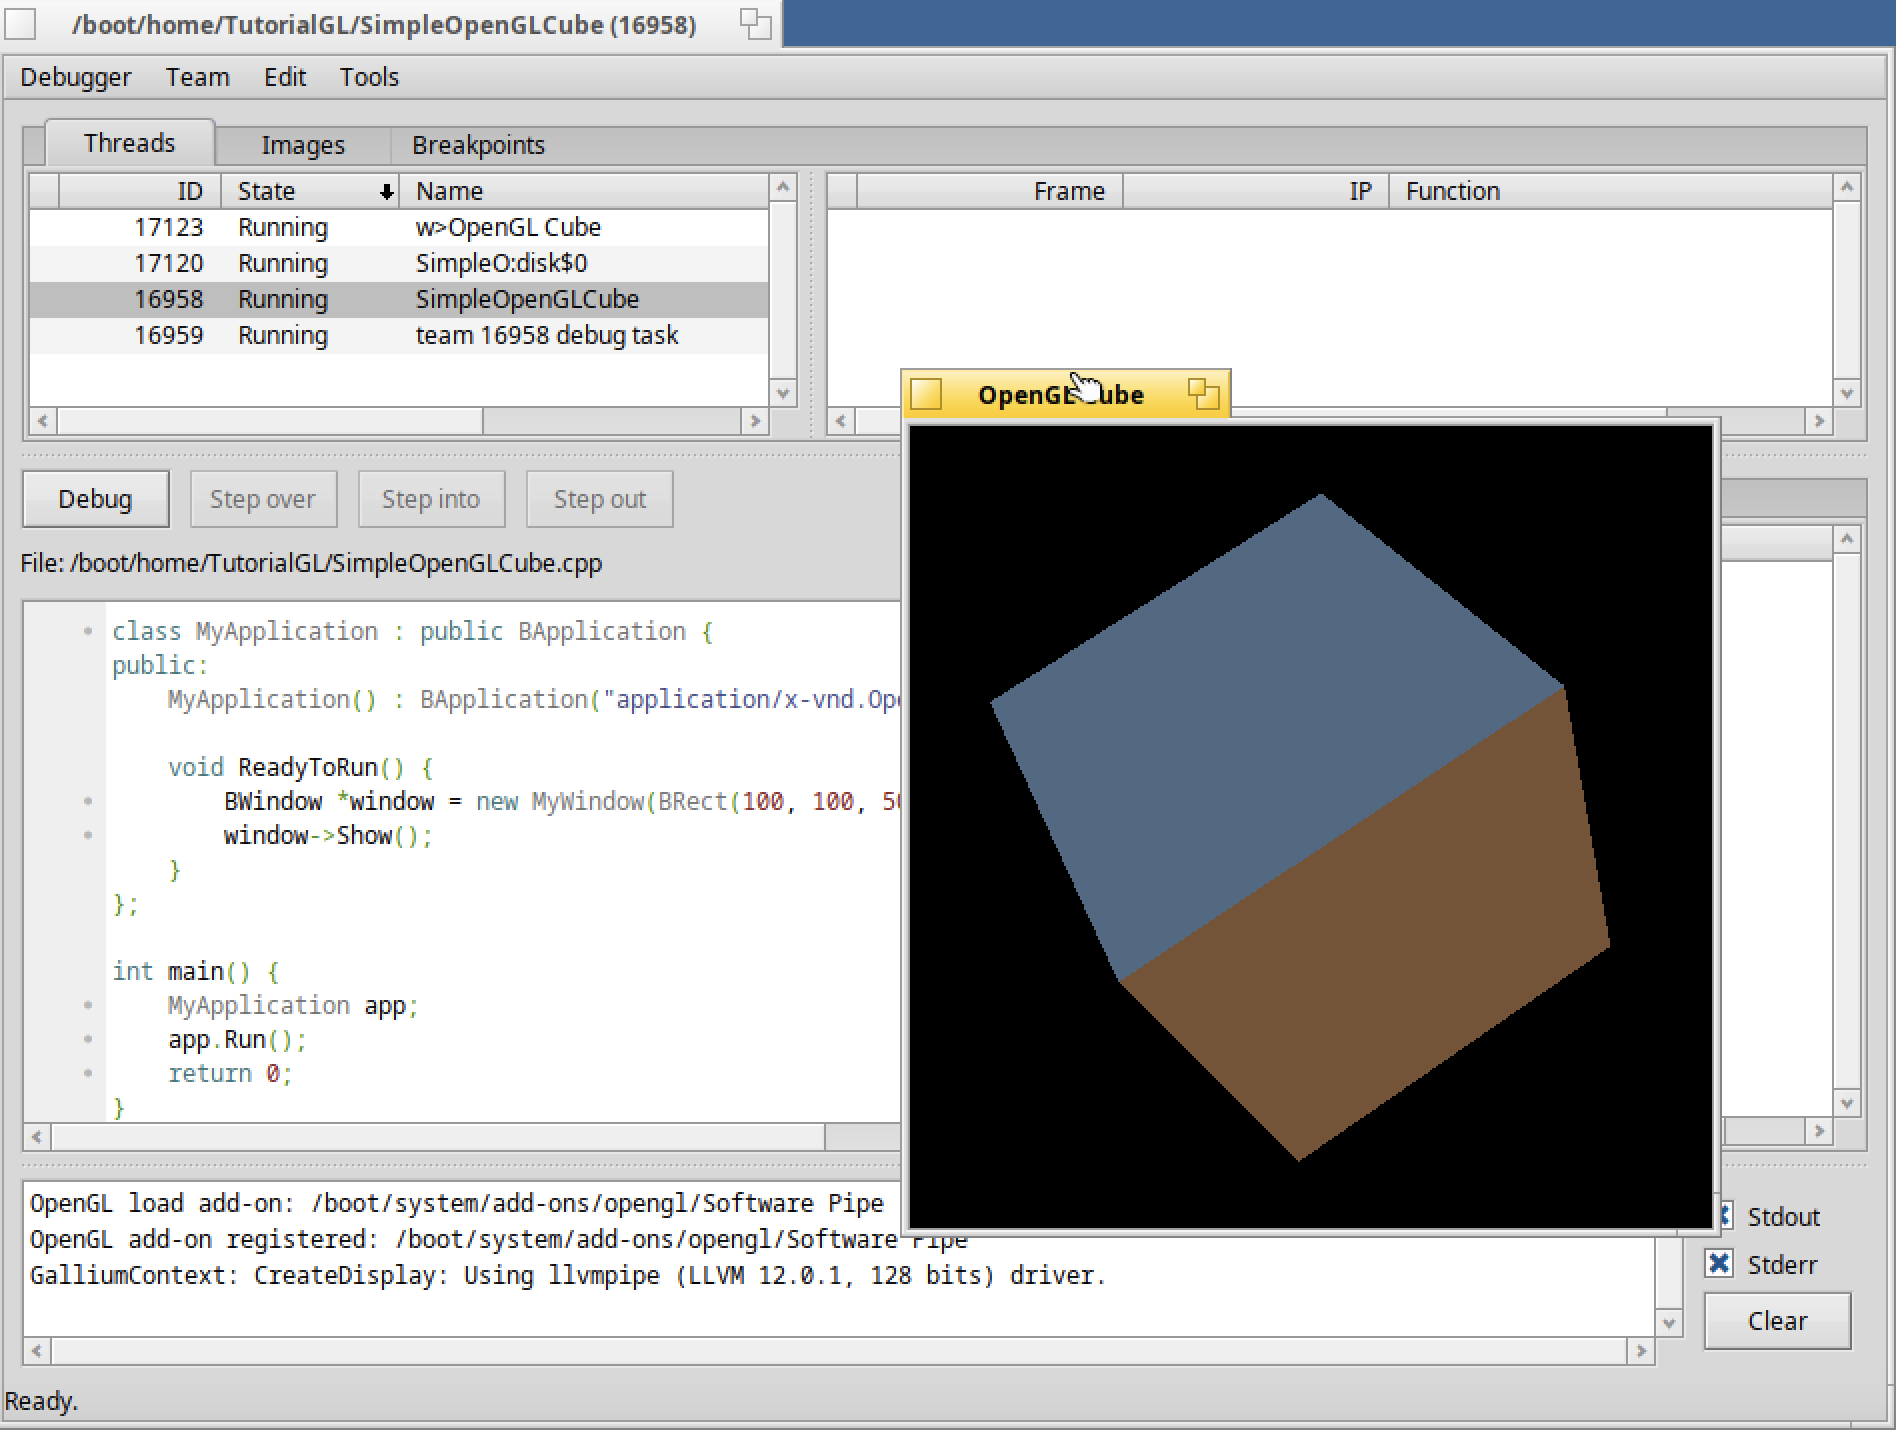
Click on the "Run" button in order the "SimpleOpenGLCube" thread (ID 16958 above) can continue to run.
Then you should see the program running with the rotating cube :
Now add a breakpoint :
Move backward in the code, and click on the left part of the line starting with "SwapBuffers()" :
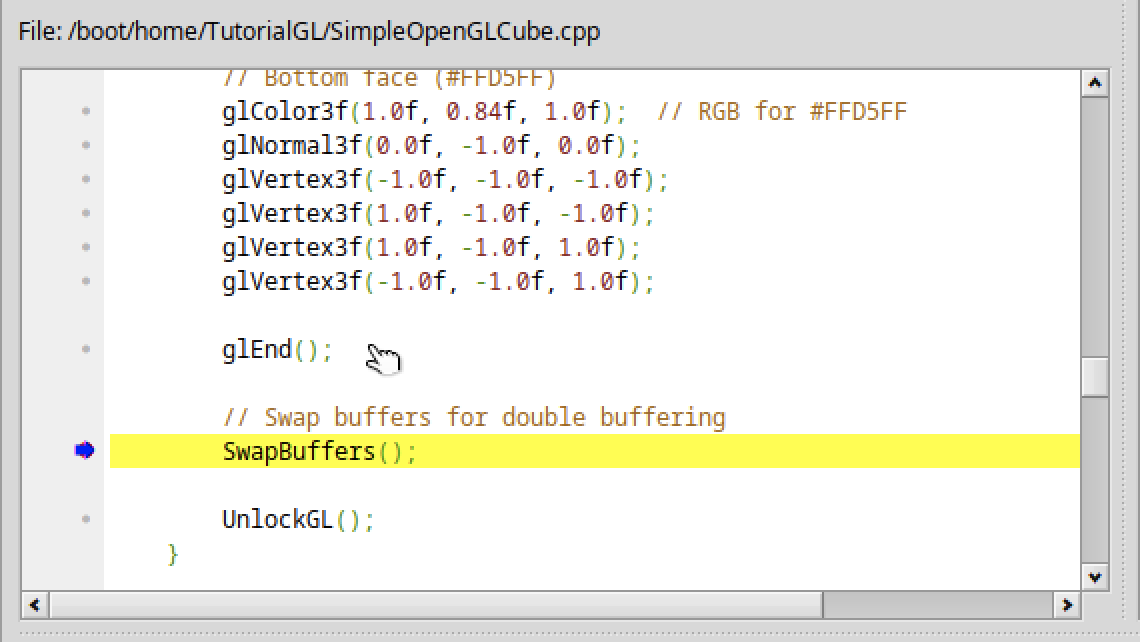
A red spot should indicate your breakpoint (just followed by a blue arrow indicating the thread just stop at this point).
Then click on "Run" button again :
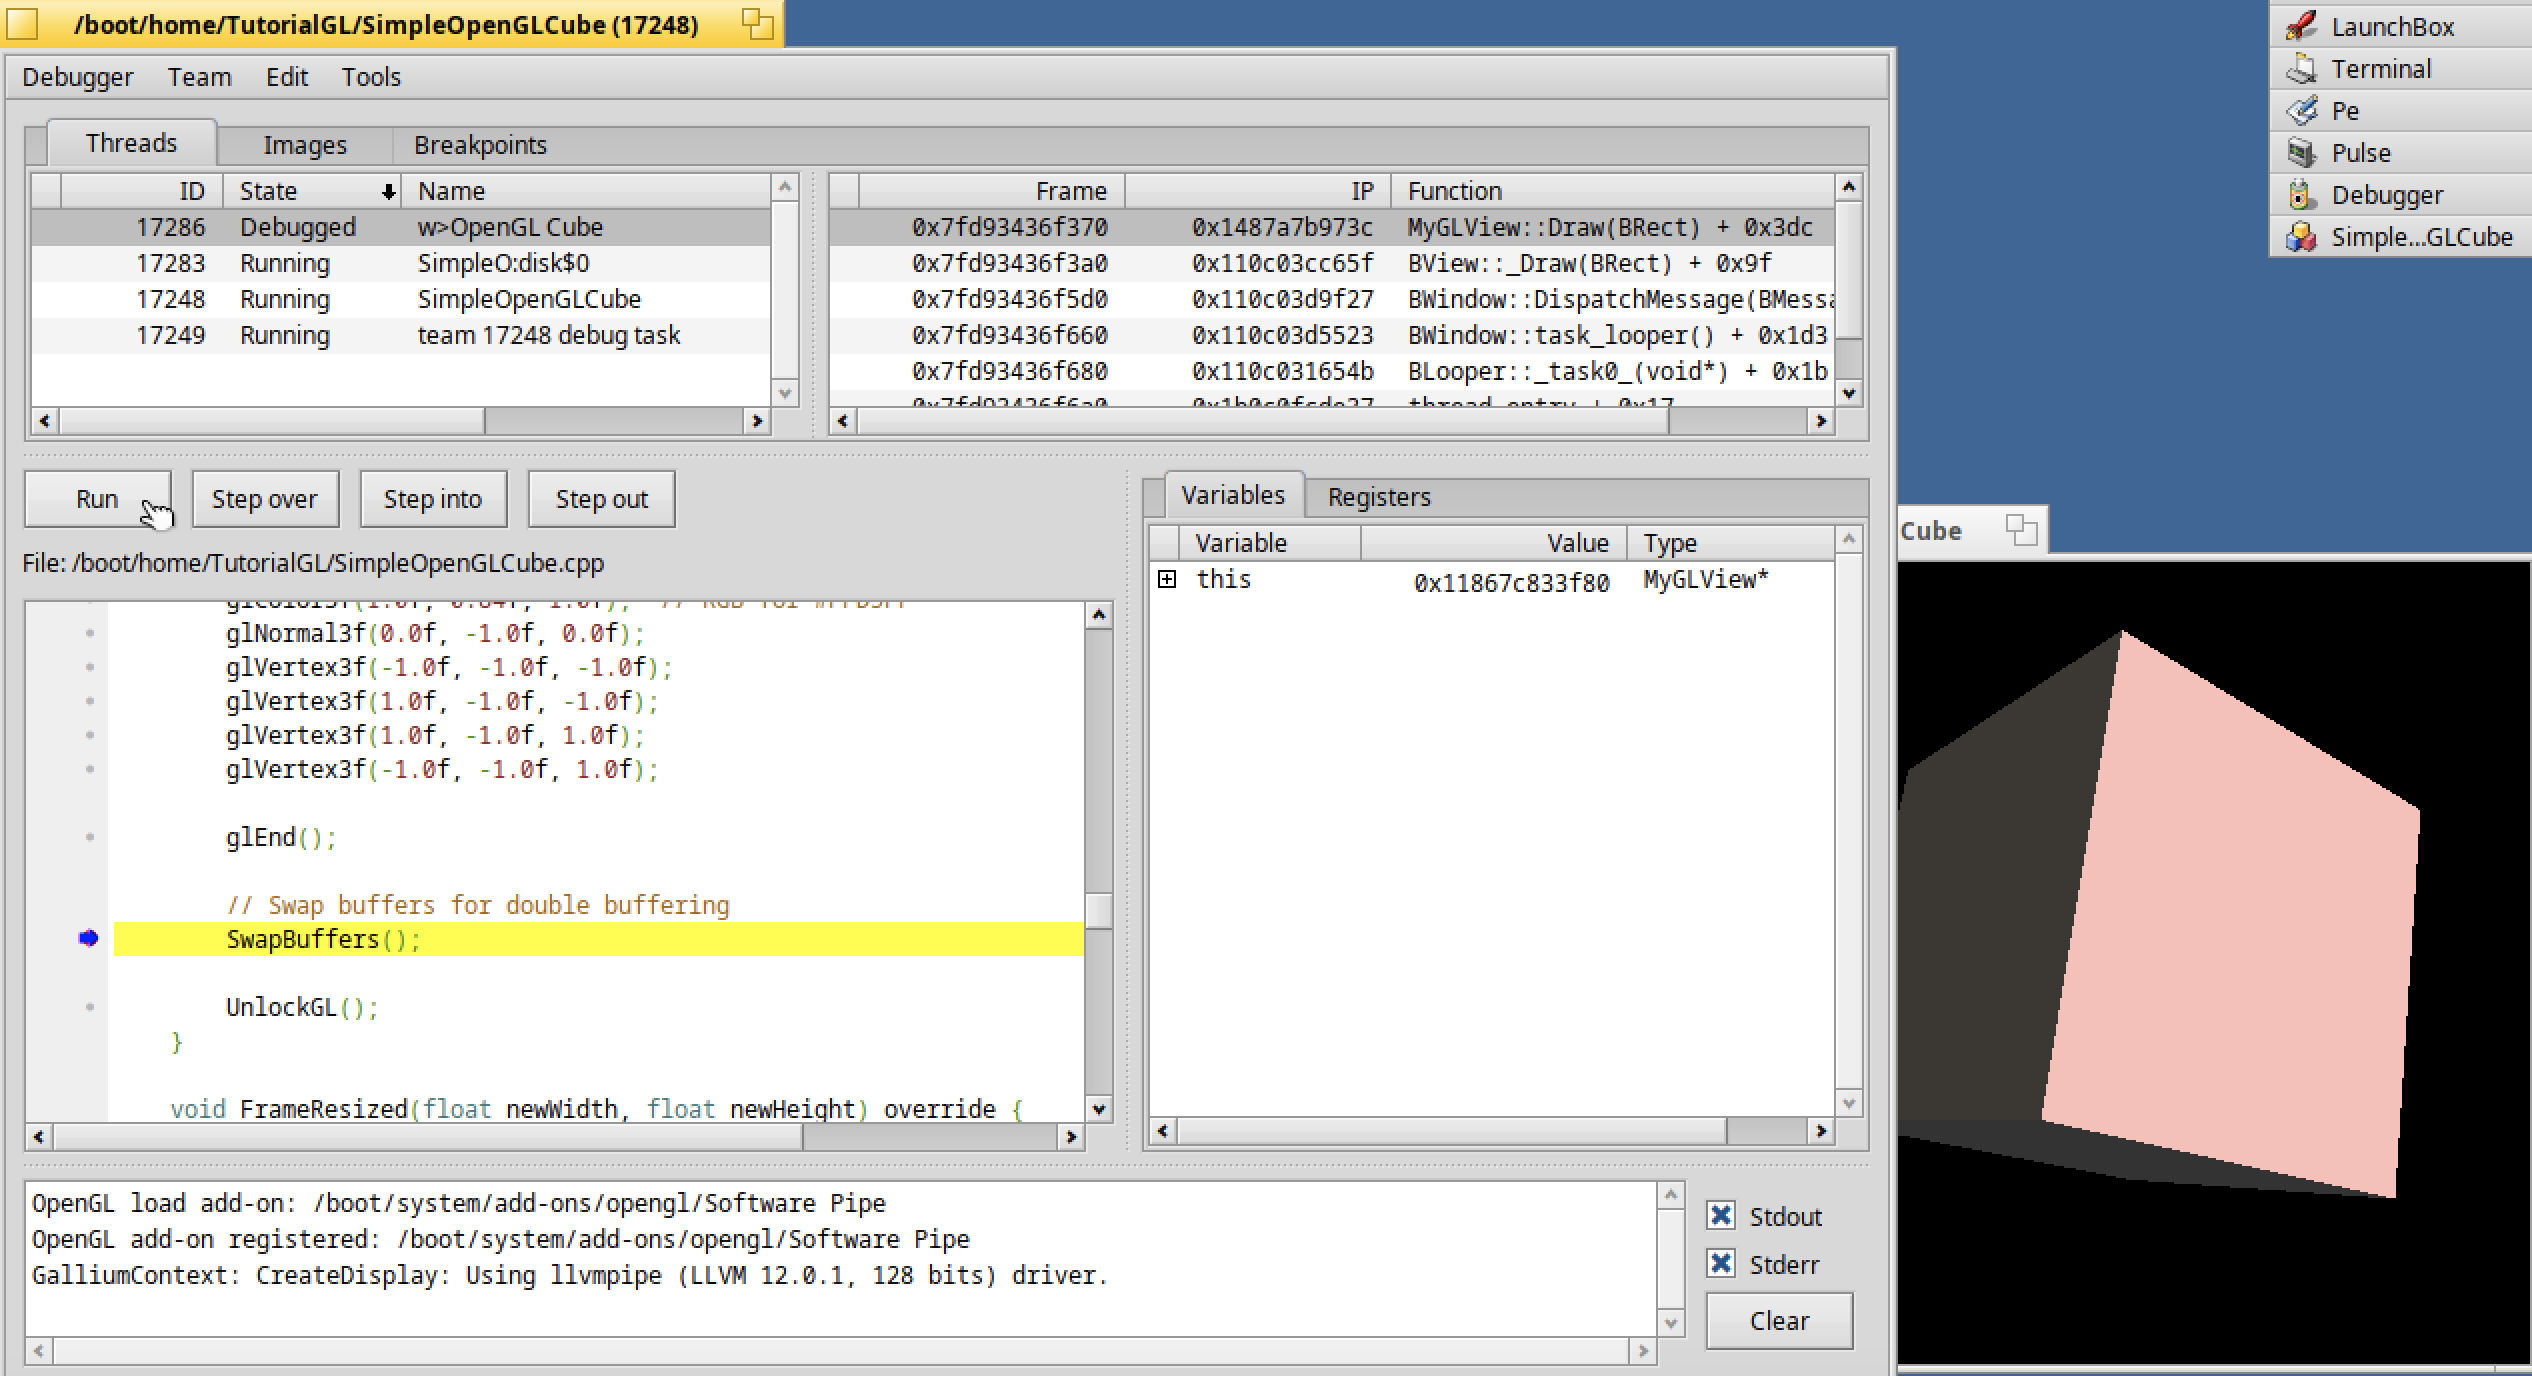
You will see the display of the cube refreshing and just after that freezing due to the breakpoint again reached.
The thread named "w>OpenGL Cube" is waiting for your answer.
If you click again on "Run" :
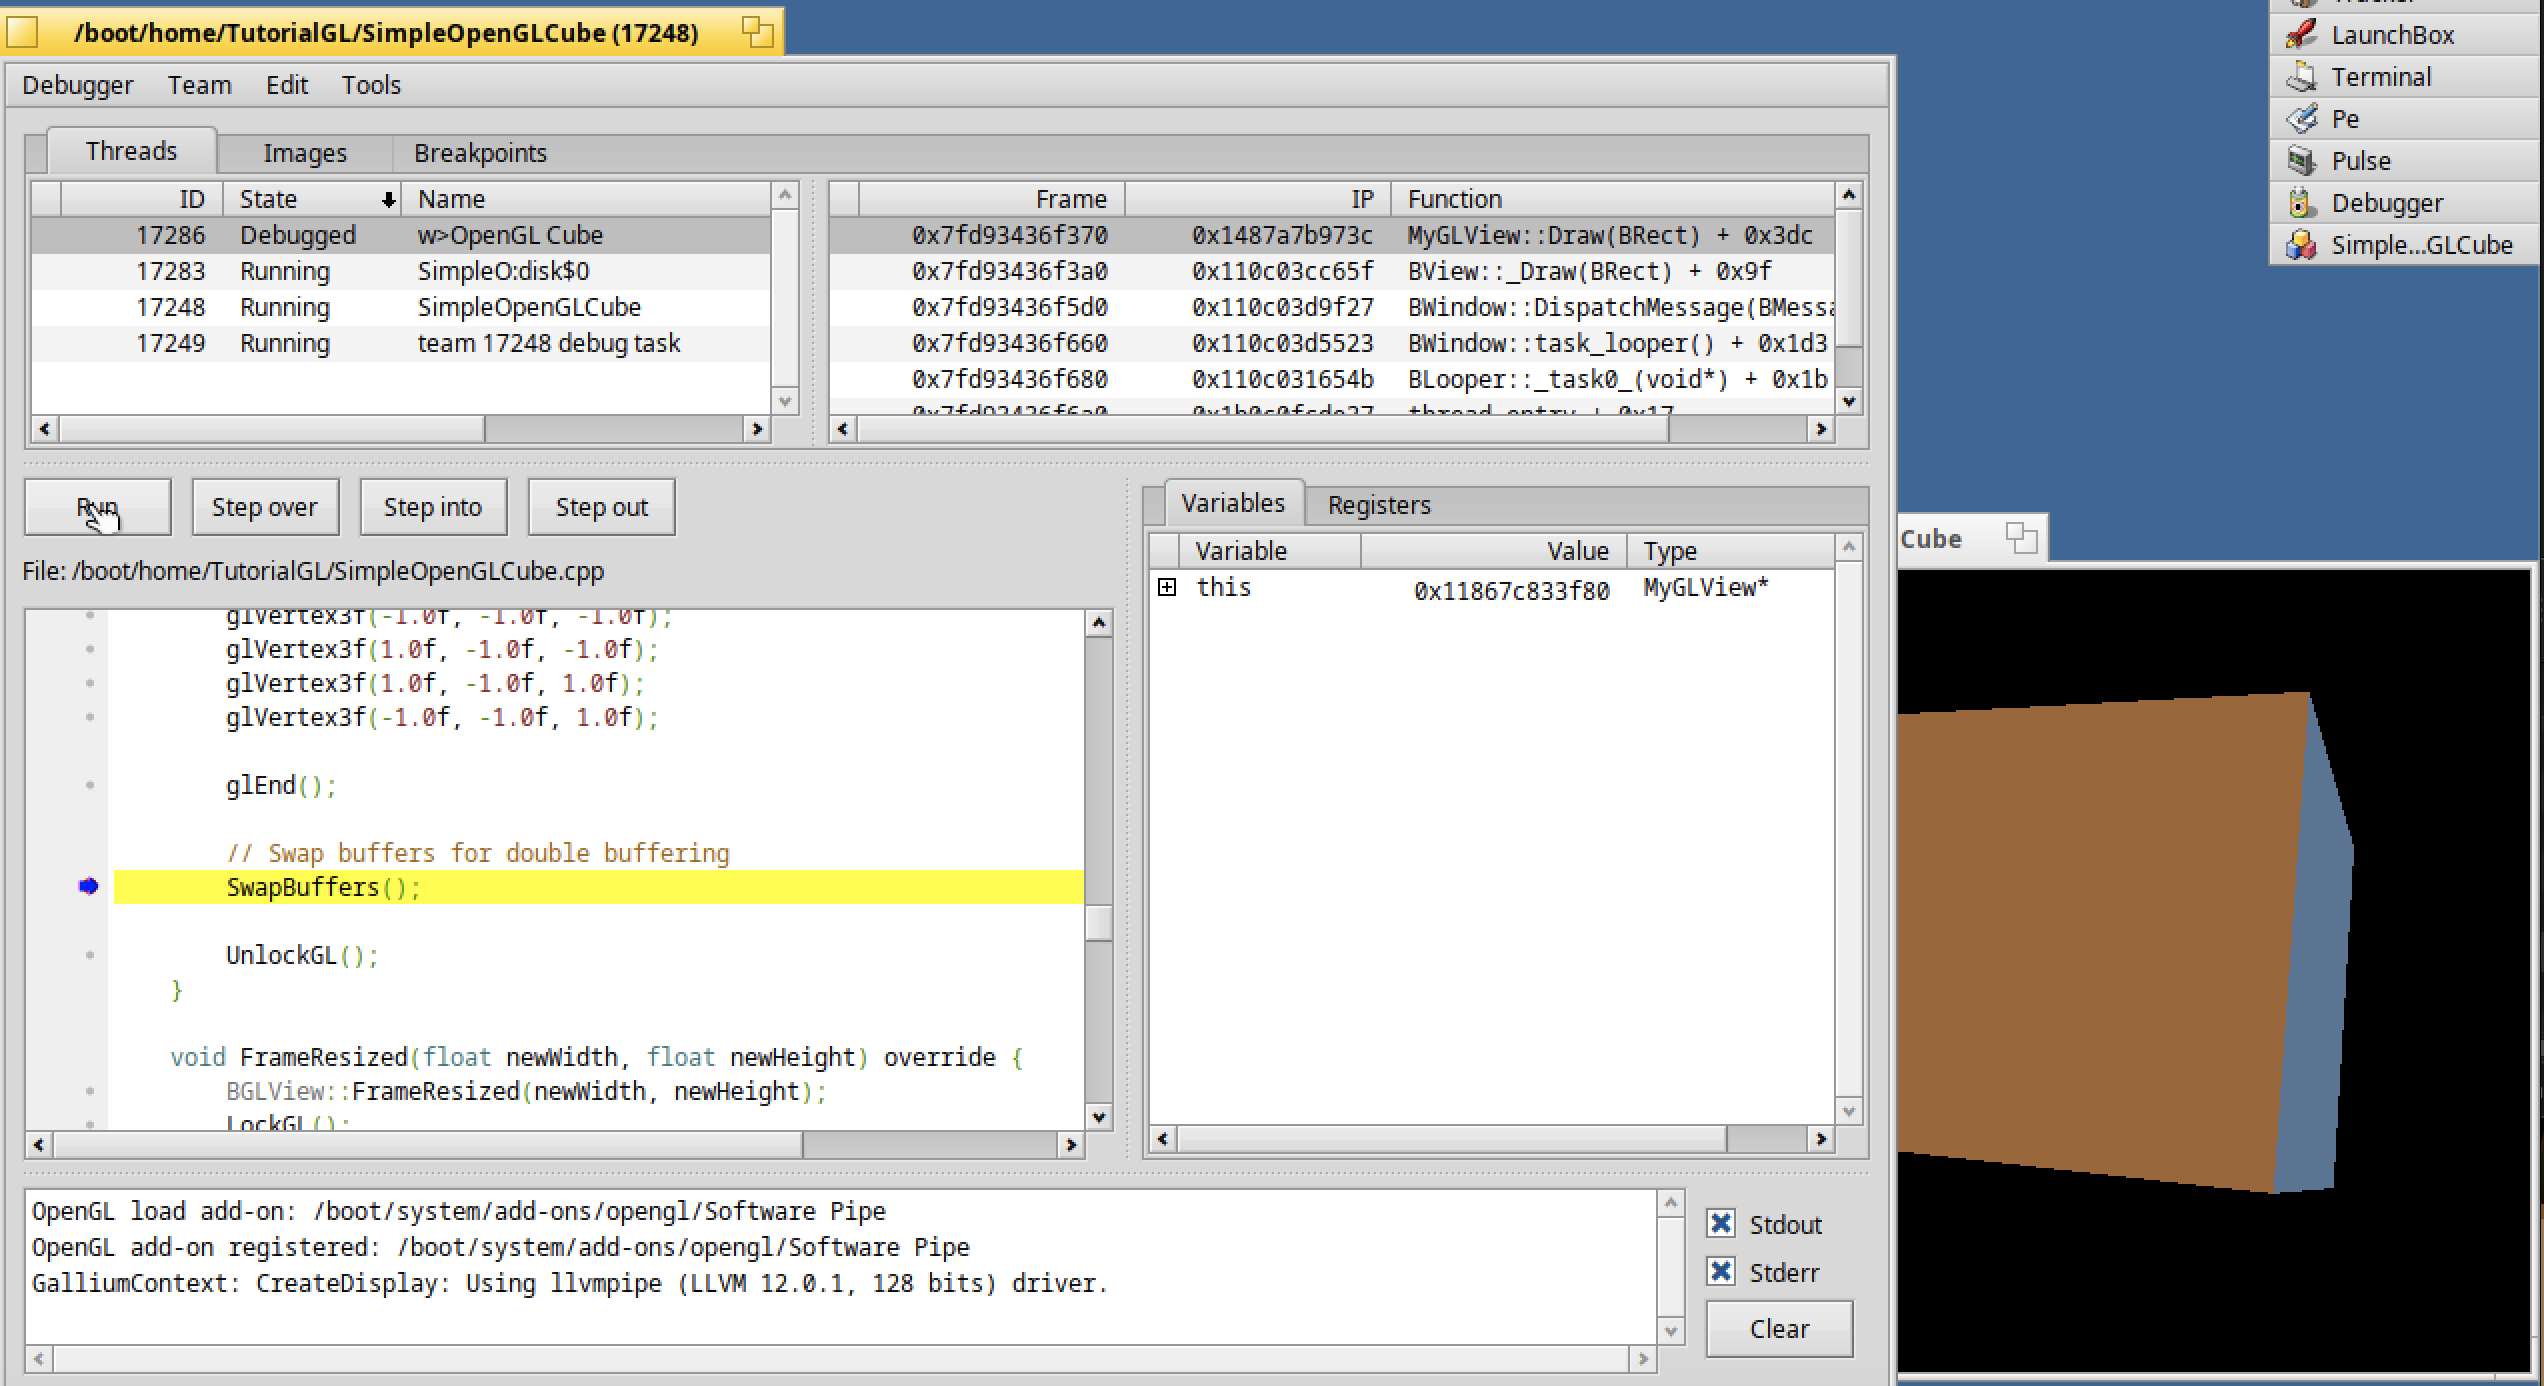
The cube will refresh again and then freeze.
The thread "w>OpenGL Cube" is again "Debugged" instead of "Running".
If you click on "Step Over", the Debugger will only move one line forward until UnlockGL() :
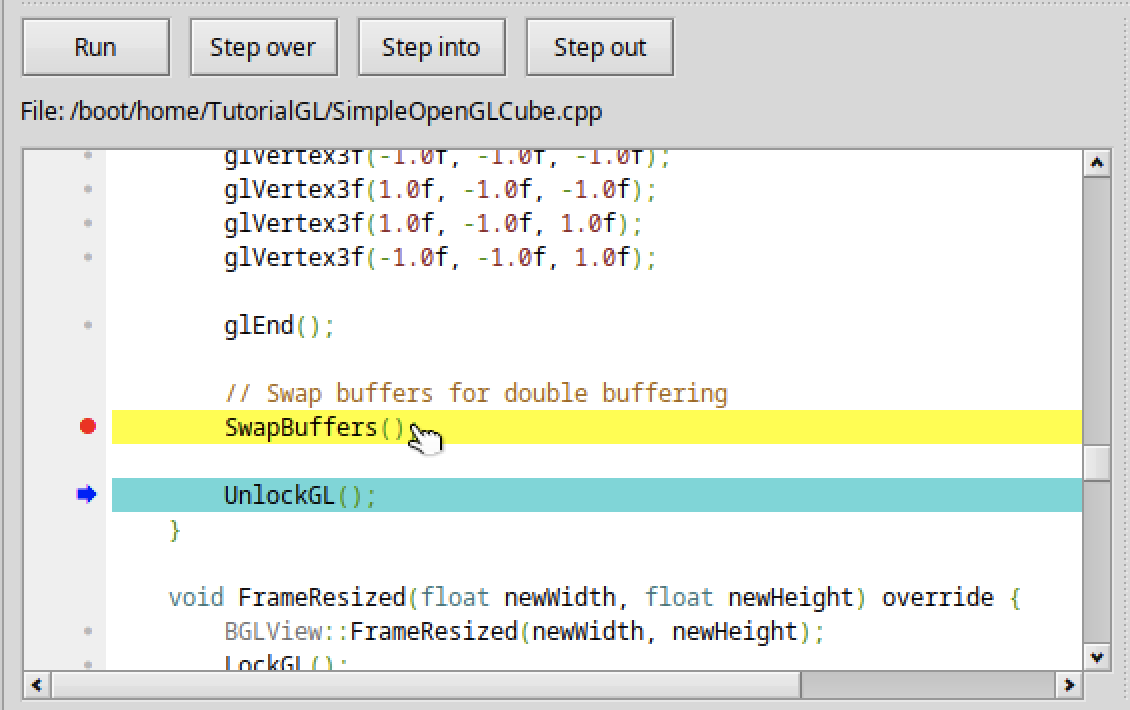
We are now fine.
You can remove your breakpoint by clicking on it, run the program again and quit the Debugger application.
As a final test, launch again Pulse and activate all the processors available :

Then launch again the Debugger :
Debugger SimpleOpenGLCube
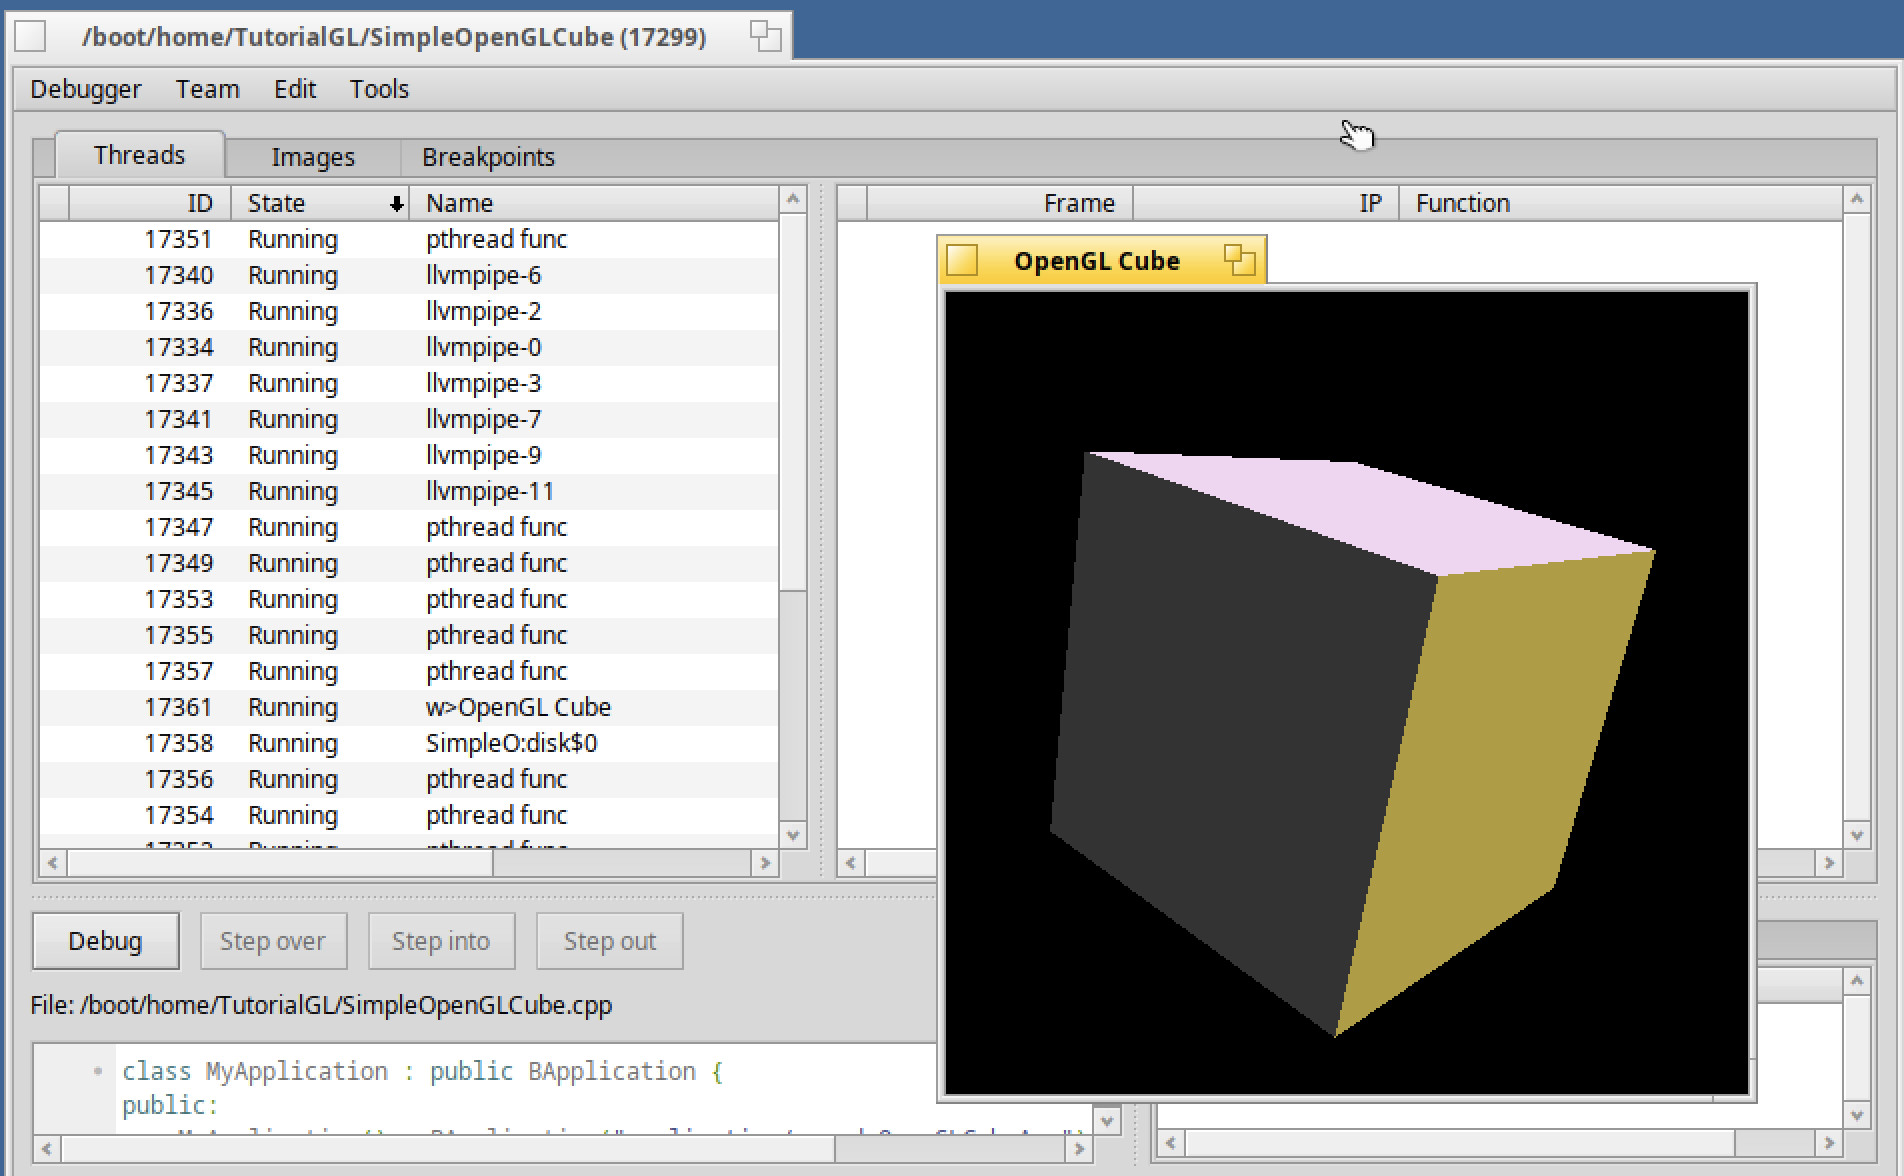
As you can see, there are now many additional threads "llvmpipe" used for each available processor visible in the Debugger tool :)
Five minutes of reading, am I right ?
Moving forward
To conclude this article, if you would like additional information regarding the development on Haiku, you can check the Development page on the official website.
Other useful resources are the Coding guidelines page, the Haiku API documentation or the Haiku forums.
When you will gain experience and handle more complex programs, you might need other tools like Genio, Qt Creator (with GNU Debugger) or Koder.
Eager to participate to the Haiku ecosystem ?
Let put a comment at the end of this article to share your mood:)